Glide Note

glidenote's blog

VagrantとSSDなVPS(Digital Ocean)で1時間1円の使い捨て高速サーバ環境を構築する

今年の初めくらいから個人的な技術検証にはSSDで動作が速く、1時間1円で料金が安いのと ロケーションをSan Franciscoにするとsshでもレスポンスが悪くないので、全部Digital Oceanを使っている。(徳丸先生が紹介する前から使っていたんだ!)

Digital OceanについてはRebuild: 2: Rails, Redis, VPS (Kenn Ejima)の42分くらいから言及されてます。必聴です。

使ってる旧型のMacBookAirみたいな貧弱なマシンだとローカルでVM動かすとファン回りまくりとかで泣きたくなるので、Digital Oceanだと泣かずに済んで快適。

そんで今日Vagrant経由でDigital Ocean利用すると、コマンドラインから必要なときに新規インスタンス(Droplet)作って、 検証終わったら削除という手軽な使い捨て高速サーバ環境が利用出来て検証に大変便利ということを知った。(APIの存在は知っていましたが、情弱なのでブラウザから毎回ポチポチやってました…)

Digital Oceanに申し込んでAPIのclient_idapi_keyを取得する

  1. Digital Oceanに申し込む
  2. https://cloud.digitalocean.com/ssh_keysで作成したインスタンスに接続するためのssh keyを登録
  3. https://cloud.digitalocean.com/api_accessからclient_idapi_keyを取得しておく

ここ経由で申し込んで頂けると私の懐が潤います!

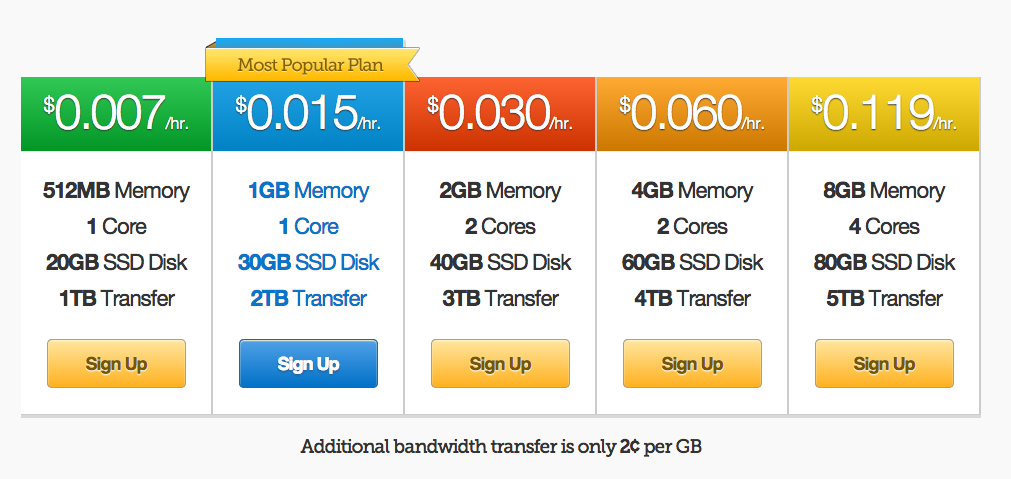
2013年12月05日現在の1時間あたりの料金プランは下記のような感じ

Vagrantをインストール

Vagrantからファイルをダウンロードしてインストール。2013/12/05現在最新の1.3.5を利用してます。

vagrant-digitaloceanのインストール

vagrantコマンドでvagrant-digitaloceanをインストール。vagrant-digitaloceanは2013/12/05現在最新の0.4.1を利用

1
vagrant plugin install vagrant-digitalocean

curl-ca-bundleのインストール

apiを叩くのに必要なので、brewで導入

1
brew install curl-ca-bundle

Vagrantfileを作る

私は下記のようにディレクトリを掘って、Vagrantfileを用意

1
2
3
mkdir -p ~/repos/vagrant-digital-ocean
cd ~/repos/vagrant-digital-ocean
touch Vagrantfile

2013年12月9日 追記
申込みが増えているのかサンフランシスコで最小プラン(メモリ512MB)がずっと売り切れの状態なので、 provider.size = '1GB'にするか、provider.region = 'New York 2'など別ロケーションを選択するなどの必要があります。1GBプランだと1時間約2円(0.015ドル)です。

私が使ってるファイルの中身は下記のような感じ。設定したssh keyの名前や、APIページで取得したclient_idapi_keyはここで設定。 repoにepelを追加して、起動時に最低限必要なパッケージを入れるためにpuppetを走らせてます。

2014年7月18日 追記
DigitalOceanのAPIがv2.0になりhttps://cloud.digitalocean.com/settings/applicationstokenの生成が必要になりました. 下記の例だとprovider.token = 'xxxxxxxxxxxxxxxxxxxxx'といった形でtokenを設定する必要があります. またregionの指定方法もSan Francisco 1からsfo1という感じで変更になっています.

1
2
3
4
5
6
7
8
9
10
11
12
13
14
15
16
17
18
19
20
21
22
23
24
Vagrant.configure('2') do |config|
  config.vm.hostname              = 'dev003.hogemoge.com'
  config.vm.provision "shell", inline: "rpm -Uvh http://ftp-srv2.kddilabs.jp/Linux/distributions/fedora/epel/6/x86_64/epel-release-6-8.noarch.rpm --force"
  config.vm.provision "shell", inline: "yum -y install puppet"

  config.vm.provider :digital_ocean do |provider, override|
    override.ssh.private_key_path = '~/.ssh/id_rsa'
    override.vm.box               = 'digital_ocean'
    override.vm.box_url           = "https://github.com/smdahlen/vagrant-digitalocean/raw/master/box/digital_ocean.box"

    provider.client_id            = 'xxxxxxxxxxxxxxxxxxxxx'
    provider.api_key              = 'xxxxxxxxxxxxxxxxxxxxxxxxxxxxxxxx'
    provider.token                = 'xxxxxxxxxxxxxxxxxxxxxxxxxxxxxxxx'
    provider.image                = 'CentOS 6.4 x64'
    provider.region               = 'sfo1'
    provider.size                 = '512MB'
    provider.ca_path              = '/usr/local/opt/curl-ca-bundle/share/ca-bundle.crt'
    provider.ssh_key_name         = 'office mac'
  end

  config.vm.provision "puppet" do |puppet|
    puppet.options                = "--verbose --debug"
  end
end

manifests/default.ppは下記のような感じ。

1
2
3
4
5
6
7
8
9
10
11
12
13
14
15
16
17
18
19
20
21
22
23
24
25
26
package {
  [
    'vim-enhanced',
    'zsh',
    'tmux',
    'mosh',
    'git',
    'tig',
    'gcc',
    'dstat',
    'iftop',
    'iotop',
    'nethogs',
    'ruby',
    'ruby-devel',
    'rubygems',
    'rubygem-json',
    'tree',
    'wget',
    'xinetd',
    'nc',
    'fping',
    'perf',
    ]:
      ensure => present;
}

インスタンスの作成

vagrant upコマンドを利用して、インスタンスを作成。ドンッ!

1
vagrant up --provider=digital_ocean

すると下記のように数分でインスタンスが作成される。

1
2
3
4
5
6
7
[usr0600093@pmac008s] $ vagrant up --provider=digital_ocean
Bringing machine 'default' up with 'digital_ocean' provider...
[default] Using existing SSH key: office mac
[default] Creating a new droplet...
[default] Assigned IP address: xxx.xxx.xxx.xxx
[default] Modifying sudoers file to remove tty requirement...
[default] Rsyncing folder: /Users/usr0600093/repos/vagrant-digital-ocean/ => /vagrant...

San Francisco 1だと時間帯によって結構時間かかるので、 早めに検証したい場合はNew York 2とかに変更すると良いかも。

私はpuppet走らせるので、--provisionを付けてインスタンス作成してます。

1
vagrant up --provider=digital_ocean --provision

起動したインスタンスにssh接続

vagrant sshでssh接続するとIPを覚えておく必要がない。

1
vagrant ssh

使い終わったらインスタンスの削除

Digital Oceanは停止状態(halt)だと課金されるので、使い終わったら、インスタンスをdestroyで消す。

1
vagrant destroy

なんて便利な時代なんだ!手元のMacBook Airも熱くない!!

参考

Comments